GraphQL authorization: Adding authorization to a server

One of the de facto standards of tackling how decoupled systems interact together is by building APIs. In recent years, GraphQL has gained popularity in developing web APIs. GraphQL spec uses a declarative query language that favors flexible queries to your client's demands. On the backend, you create a strongly typed schema to resolve data so the clients can send arbitrary queries for the exact data they want, which you will validate against your schema.
However, building GraphQL APIs differs from architectural styles like REST. In REST, everything is a resource defined by a URL. The REST architecture leverages stateless operations such as POST, PUT,GET, and DELETE. When you need to combine data from multiple endpoints in REST, you run numerous round-trip requests. Each round trip will have the overhead of establishing a network request, making the API inflexible. GraphQL, on the other hand, exposes a single endpoint for clients to request the exact data they need and get it back in a single response.
In this article, you'll learn about the best practices for implementing access control patterns in GraphQL APIs.
How is Authorization Different in GraphQL
Unlike the REST API environment, where there's a single entry point for authorization, the GraphQL spec is unopinionated about how authorization is implemented. For flexibility, GraphQL ensures that you have ad-hoc requests, and therefore can have multiple layers where you can delegate authorization, such as field resolvers and the data layer.
REST API endpoints only return responses with a single resource type,eg Books. This makes authorization easy, as you can authorize individual endpoints. GraphQL gives the client the freedom to submit arbitrary queries describing the exact data they need to fetch, and then returns it all in a single response. Securing dynamic data access is hard, hence authorization in a GraphQL API needs to be dynamic and flexible.
Ways of Implementing Authorization in GraphQL
In this section, you'll dive into various methods of handling authorization logic in a GraphQL API. Before you can control a user’s access to data, the user has to be authenticated first. Usethis example to learn how to create a GraphQL Apollo server and modify thecontext object as shown below to include theuser object. The context object is then passed to every executed resolver, which can then use the object to determine if a user has access to certain data.
context: ({ req }) => {
  // Extracting the user token from the headers
  const token = req.headers.authorization || '';

  // Retrieving a user with the token
  const user = getUser(token);

  // Adding the user to the context object
  return { user };
},
API-Wide Authorization
API-wide authorization is commonly referred to as the all-or-nothing approach, since it permits or restricts access to the entire API. Once a request is received from a client, you can deny them the ability to execute a query based on their role. Performing this kind of authorization requires you to modify the context function as shown in this code snippet:
context: ({ req }) => {
 // extract the user token from the HTTP headers
 const token = req.headers.authentication || '';

 // try to retrieve a user associated with the token
 const user = getUser(token);

 // logic for checking the user roles can be implemented here
 if (!user) throw new AuthorizationError('login required');

 return { user };
},
API-wide authorization can be easily implemented in private environments where the organization doesn’t want to expose the schema or any of the fields to the public. However, this approach locks queries, making your API inflexible when you need to implement field-level accessibility.
Authorization in Resolvers
Resolvers are functions that define how you perform actions against your data from the fields on the type definitions. GraphQL offers granular control over data by delegating authorization to individual field resolvers. This allows the developer to create individual field resolvers that check individual user roles and return the appropriate data for each user.
Unlike the API-wide approach, implementing authorization in the resolvers offers enormous flexibility. You have the logic close to the components the end-users will interact with, and all you need to do is to grant queries and mutations based on roles. When developing large systems, this reduces the baggage of hunting down the logic that prevents unauthorized users from accessing the data. However, this approach comes with the potential drawback of needing to repeat code across multiple resolvers.
To implement this approach, you need to use the user information attached to the context object.
books: (root, args, context) => {
 if (!context.user || !context.user.roles.includes('admin')) {
  return null;
 }
 return ['book 1', 'book 2’'];
}
The above example shows a field in the schema named books, which returns a list of books. The if statement checks the context generated from the request for a user roles array with the admin role, and if one doesn’t exist, it returns null for the whole field. This dictates that only users with the admin role can access the list of books.
This approach is useful if there are some public fields that are shown to anyone, while the others are only shown to authorized users. It also allows you to limit possible errors that could expose sensitive data by short-circuiting resolvers, and not calling lookup functions when the permissions to use them are not available.
On the other hand, this approach can become tedious, since you need to write authorization checks on every resolver, replicating logic.
Authorization in Models
This approach is useful when you have the same fetching logic in multiple places. GraphQL recommends moving the data fetching and transformation logic from the resolvers to centralized model objects as a general practice. This helps clean up the resolver by delegating authorization to models.
To delegate authorization to models, you need to add the models to the context. To generate models with a function, this code can be used:
context: ({ req }) => {
 // extract the user token from the HTTP headers
 const token = req.headers.authentication || '';

 // try to retrieve a user associated with the token
 const user = getUser(token);

 // logic for checking the user roles can be implemented here
 if (!user) throw new AuthorizationError('login required');

 return {
    user,
      models: {
        User: generateUserModel({ user }),
      }
  };
},
This gives all the model methods in the User model access to theuser information, which can be used to check permissions directly without using the resolvers.
The downside of this approach is that it does not allow you to know authorization rules at a high level when you need to return early. Knowing the rules at a high level can help the API avoid executing many procedures that should not be executed if the user is not authenticated to access certain resources.
Using an ABAC system like Cerbos
The Role-Based Access Control (RBAC) approach is often brought up as a solution, but quickly becomes inflexible, as you need to duplicate a lot of functional hierarchy in a system where access roles change often. Organizations with multiple departments, such as sales, IT, marketing, and human resources, need specific rules; system administrators often get the cumbersome task of defining permissions. Furthermore, the tightly coupled model becomes cumbersome to redesign over time.
Another alternative to implementing authorization is using attribute-based access control. With this approach, the access model provides security rules applied as object attributes. These attributes act as scope metadata to infer whether the user should be granted specific actions against the resource. It favors configuration over code, enabling an approach where you can define roles of various users, such as developers, salespeople, marketers, or product managers in a human-readable definition language.
One of the popular tools that provides Attribute-Based Access Control is Cerbos. Cerbos is a self-hosted, open source access control provider that allows you to offload tedious authorization decisions from backend services to a dedicated provider. This approach makes it easier to decouple authorization logic as configuration scripts to ensure consistency between various services.
Running Cerbos requires you to configure a server by defining the port and the location for storage of local policies. A simple configuration file takes this format:
---
server:
 httpListenAddr: ":3592"
storage:
 driver: "disk"
 disk:
   directory: /policies
After you've defined the configuration, Cerbos can be run asa Docker container or as a binary.
Cerbos also requires you to define policies that dictate the permissions allowed for a given user. A simple policies file looks like this:
---
apiVersion: api.cerbos.dev/v1
resourcePolicy:
 version: "default"
 resource: "Project" // Name of the resource whose permissions are being defined.
 rules: // list of rules on the resource. In this case, a user is only allowed to create and read a project, while an admin can also delete and update the project.
   - actions:
       - create
       - read
     effect: EFFECT_ALLOW
     roles:
       - user

   - actions:
       - create
       - read
       - update
       - delete
     effect: EFFECT_ALLOW
     roles:
       - admin
With the user actions defined, Cerbos can be called inside GraphQL resolvers, as discussed in the Cerbos GraphQL demo onGitHub.
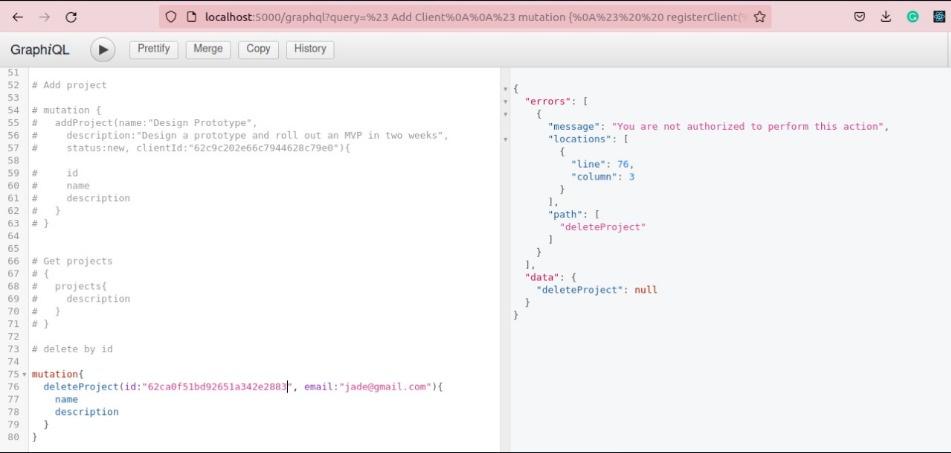
From the policies defined above, making a delete request as a user who is not allowed will result in an error:
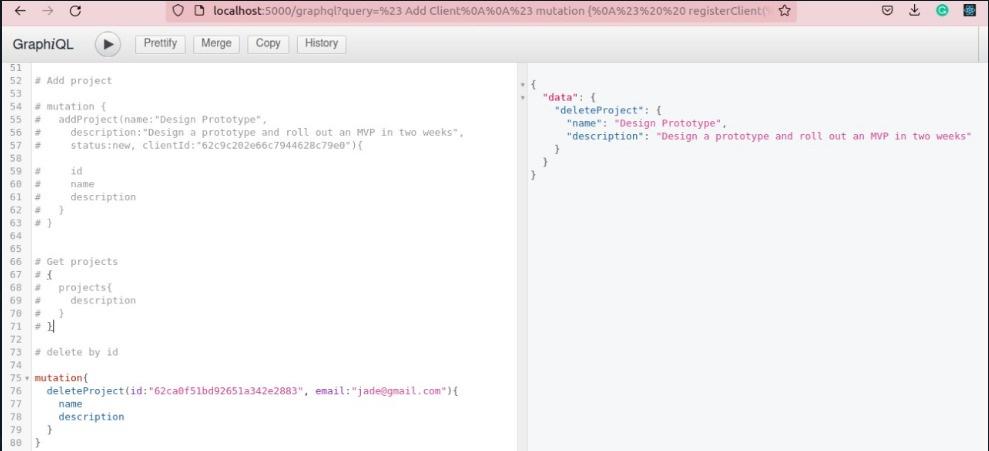
For an admin, the delete action is allowed, and there won't be an error:
This approach has a number of benefits. It offers fine-grained control over authorization, and policy updates do not require redeploying the application. Any part of the application stack can check to see if a user is authorized to access a particular resource, thereby simplifying authorization across the entire application. Additionally, Cerbos is designed to be stateless and lightweight, which makes communication overhead effectively negligible, especially with modern networks.
The downside of this approach is that being a new concept, some developers may find it hard to implement in their applications as it includes technologies they haven’t worked with before. Also, Cerbos needs context from the request to make decisions, so it may need to be called in multiple locations, possibly even in each individual field level, for fine-grained permissioning of every field in a query.
The benefits of integrating Cerbos
Cerbos is an innovative and versatile authorization engine that provides a variety of benefits to those developing GraphQL applications. When you combine GraphQL’s flexibility and efficiency with the fine grain access control provided by Cerbos the result is a more effective and secure application that is also easily scalable and extremely responsive to user needs. Some benefits include:
Enhanced security: With Cerbos you are able to create precise access control policies that ensure only those with a valid reason have access to certain information. Cerbos allows you to define attributes that are applied to access requests including user roles, the type of action being requested and the type of resource the user is requesting access to. By integrating Cerbos authorization into their GraphQL application developers provide enhanced security against myriad potential threats.
Scalability: As applications grow increasingly complex and sophisticated scalability becomes a pressing challenge. One way to mitigate that challenge is to simplify authorization by integrating Cerbos into your GraphQL application. You’ll save plenty of time and aggravation compared to trying to create your own authorization system and your results will be easily scalable as your needs grow and change.
Flexibility: Both Cerbos and GraphQL are known for their flexibility. When combined the two produce an application that is responsive, secure and versatile. Cerbos enables fine-grain access control by allowing you to create flexible and precise access policies. By making Cerbos your GraphQL authorization engine you ensure your app will easily and reliably address all your various authorization requirements.
Enhanced compliance: Using Cerbos for GraphQL authorization will facilitate your compliance efforts by creating detailed logs of all access requests and decisions. Auditing becomes a simple and straightforward process that will enable you to meet both your internal compliance obligations and your external regulatory requirements. You will always be able to determine who accessed what and when.
Speedier Development: With the need to focus on creating and implementing a GraphQL authorization system of their own lifted from their shoulders developers are able to focus on creating more responsive and effective core functions. When the time does come implementing and later updating the Cerbos authorization system will be a relative breeze.
Ultimately, using Cerbos to handle GraphQL authorization will produce a host of benefits. Cerbos is the smart and cost-effective choice that can greatly simplify and speed up the GraphQL app development process while ensuring the final product is secure, flexible and easily scalable.
Conclusion
This article has covered what makes GraphQL very different from REST. It has also discussed multiple places where you can implement authorization in your GraphQL API with their pros and cons.
As GraphQL continues to become more popular, decoupling and centrally managing authorization logic becomes vital. Cerbos is a popular open source solution that lets you define and consistently share your authorization policies using declarative YAML files, which can integrate seamlessly with any environment. You can learn more about Cerbos, or check out how tointegrate Cerbos in your GraphQL API.
Book a free Policy Workshop to discuss your requirements and get your first policy written by the Cerbos team
Related Articles


Subscribe to our newsletter
Join thousands of developers | Features and updates | 1x per month | No spam, just goodies.