Mapping business requirements to authorization policy
After users review and like what they see in Cerbos, a few of the common question we get are:
- How do we get started?
- What do we do next?
- How do you suggest we start adopting Cerbos?
A recipe for adoption
There are many different ways of getting started with Cerbos. However, here is a pattern we recommend:
- Make a mental model of your requirements
- Start with RBAC
- Build a policy file for each resource kind
- Use the playground to test and refine your policies
- Use TDD to make sure future changes to policies will not break your current requirements
- Test how Cerbos API behaves from your code
- Enhance your policies and take advantage of ABAC
- OPTIONAL: Define derived roles for contextual role decisions
- Deploy Cerbos in your local environment
- OPTIONAL: Incrementally adopt Cerbos; do not rip and replace everything in one go.
Let's dive deeper into each one of the steps listed above.
1. Identify your requirements and build a mental model of your requirements
In order to better visualize and get a handle of all your authorization requirements we recommend to start out by modeling your resources and who should access what. The following process helps visualize and centralize all the requirements in one table.
- First, we recommend writing down all of the resource kinds in your system. The definition of a resource kind is a bit loose. The resource kinds can be business domain objects, API end points, or different types of screens. Here are a few examples for each.
- On an expense application the resources can be: user account, expense item, payments, reports etc.
- On a web application: user profile, reports, documents, activity feed
- Second, for each one of those resource kinds, identify all the different actions a principal can perform: Typical examples are: create, update, delete, add, approve, deny, and submit. However, there can always be other resource-specific actions as well.
- For example for a reporting screen possible actions are: run, view, edit, save, and share.
- For an account, some possible actions are: create, update, suspend, delete
- Third, start identifying the different types of roles the users/principals of your application can be in. For example: IT admin, junior manager, senior manager, user, CFO, etc.
You can probably notice that a matrix is starting to form here.
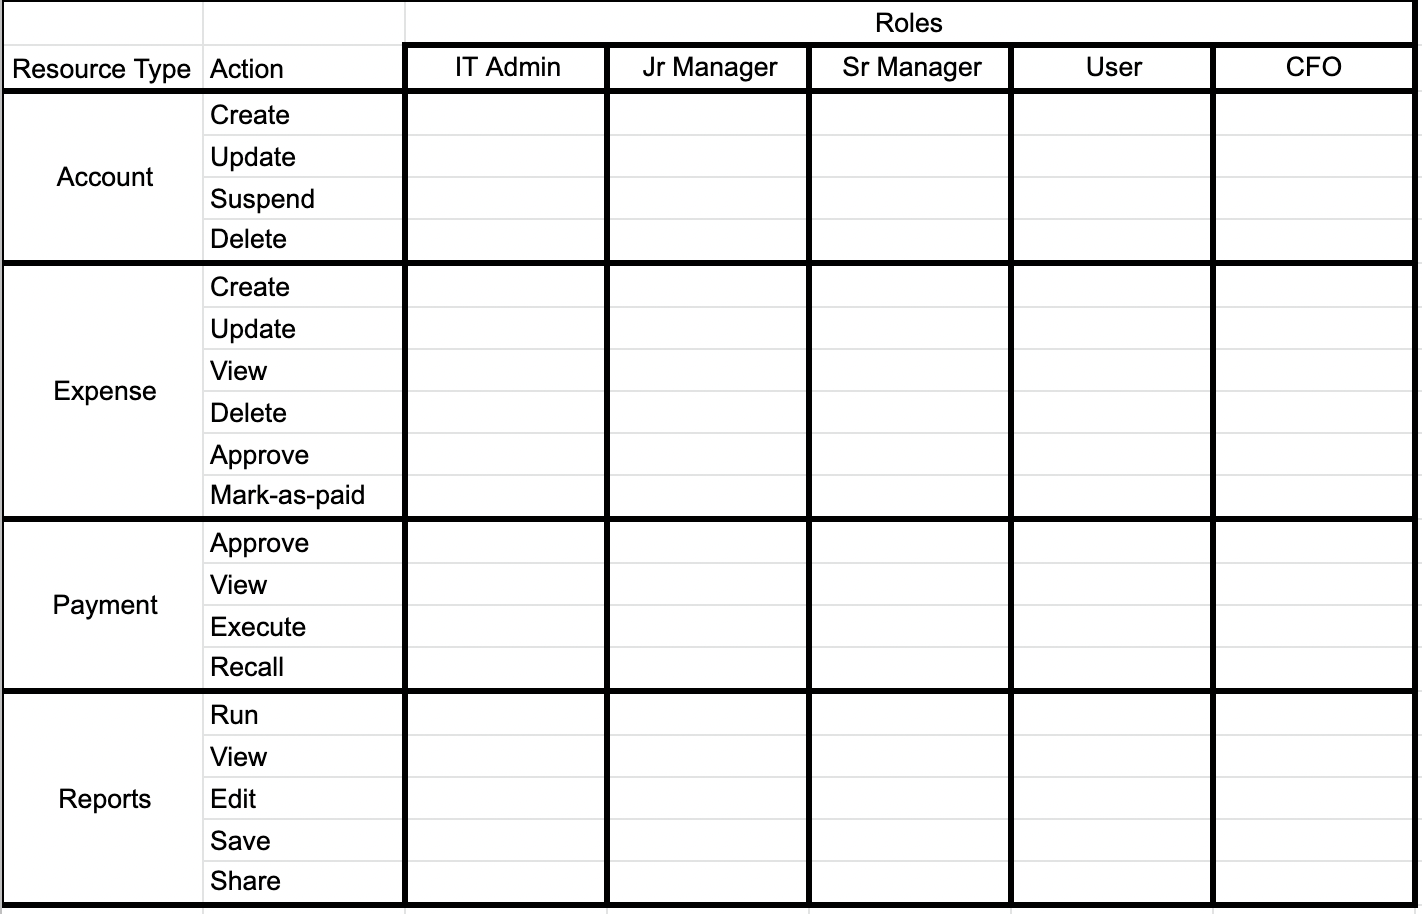
Lastly one can now start filling out each box at the intersection of resource/action and user roles with whether the user is allowed to do that action.
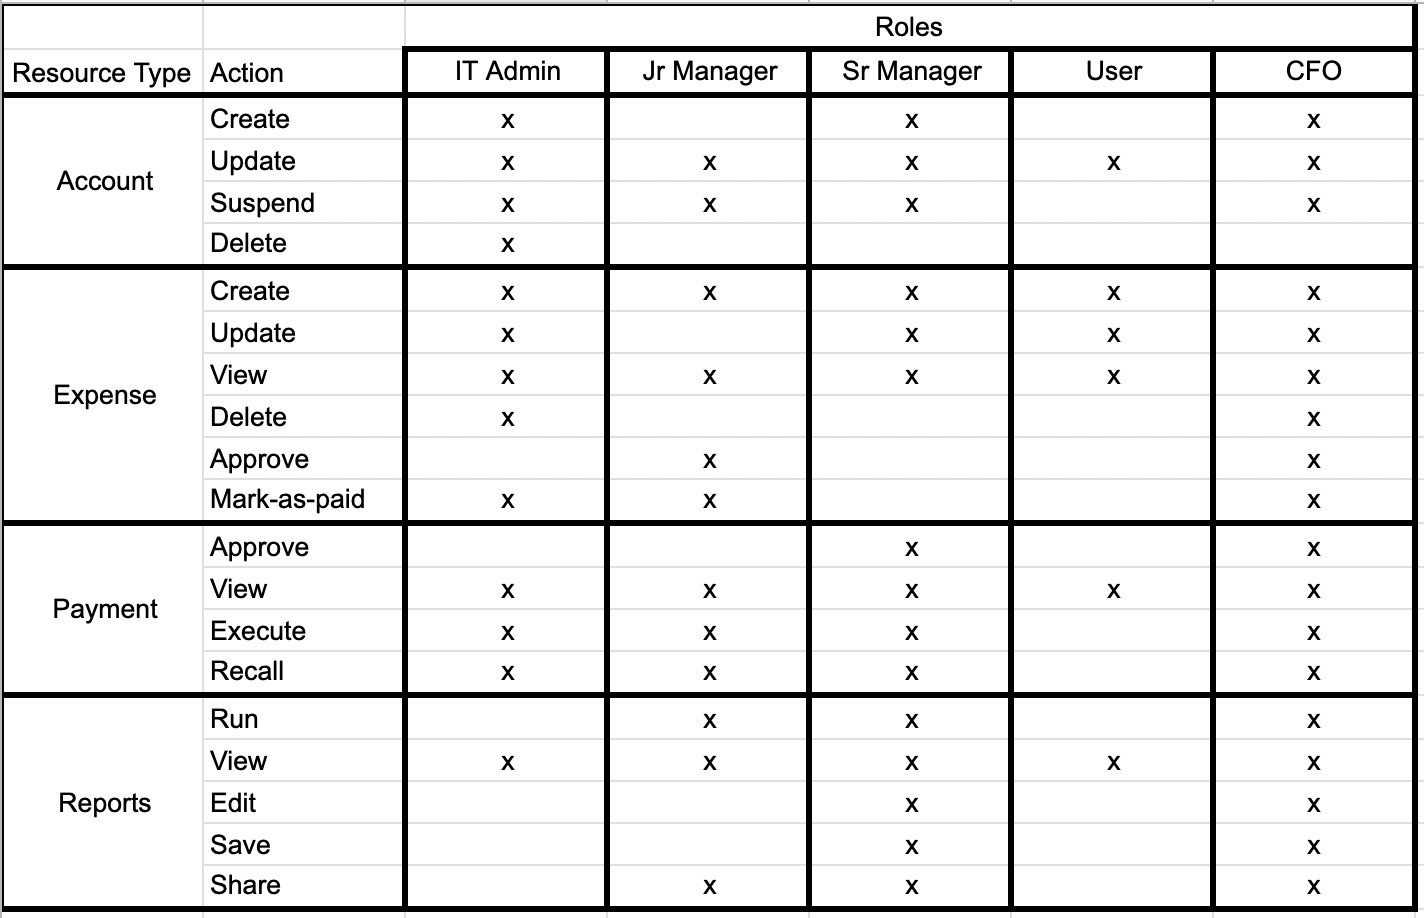
Now you can use the above matrix to start buidling out the policy files for each resource kind.
Do not let this big matrix scare you. We recommend starting out with a small, manageable set of resources first. See the Incrementally adopt Cerbos section below for more on this.
2. Start with RBAC
We recommend crawling and then walking before running. Therefore, let’s start with RBAC, role based access control, and then progress to a more advanced RBAC which is ABAC, attribute based access control.
The model we built in the previous section can easily be adapted to RBAC by mapping actions to roles. This is the simplest form for permissions management. Each role has a list of actions mapped to it. Principals (also known as users) in those roles can perform those actions.
In this example, someone who has the USER role can only perform the following actions: account:update, expense:create, expense:update, expense:view, payment:view, and reports:view.
In a later section in this document we talk about how to evolve these policies to take the context into consideration and build attribute based access control (ABAC).
3. Build a resource policy file for each resource type
Once you have mapped out which roles can perform what actions on each resource, it is time to start building policy files for each resource.
Based on the example above, here are the sample policy files for the resources, actions and roles identified.
All of the below mentioned policies can be found in this playground instance.
Account policy
apiVersion: api.cerbos.dev/v1
resourcePolicy:
  version: default
  # Defining the policy for the resource kind `account`
  resource: account

  rules:
  # Principals in the `IT_ADMIN` role are allowed to perform all actions for this resource kind.
    - actions:
        - "*"
      effect: EFFECT_ALLOW
      roles:
        - IT_ADMIN

  # Principals in these two roles are allowed to perform the `create` action
    - actions:
        - "create"
      effect: EFFECT_ALLOW
      roles:
        - SR_MANAGER
        - CFO

  # Principals in these four roles are allowed to perform the `update` action
    - actions:
        - "update"
      effect: EFFECT_ALLOW
      roles:
        - JR_MANAGER
        - SR_MANAGER
        - USER
        - CFO

  # Principals in these three roles are allowed to perfrom the `suspend` action
    - actions:
        - "suspend"
      effect: EFFECT_ALLOW
      roles:
        - JR_MANAGER
        - SR_MANAGER
        - CFO
Expense policy
apiVersion: api.cerbos.dev/v1
resourcePolicy:
  version: default
  # Defining the policy for the resource kind `expense`
  resource: expense
  rules:

  # Principals in the following two roles can peform all the actions (with one exception, see the next rule)
    - actions:
        - "*"
      effect: EFFECT_ALLOW
      roles:
        - IT_ADMIN
        - CFO

  # Although earlier it is specified that principals in the `IT_ADMIN` role can perform all the actions, the
  # following rule further specifies that they _cannot_ perform the `approve` action. This is
  # how one can caveat blanket rules.
    - actions:
        - "approve"
      effect: EFFECT_DENY
      roles:
        - IT_ADMIN

  # Principals in the following three roles can perform the `create` action
    - actions:
        - "create"
      effect: EFFECT_ALLOW
      roles:
        - JR_MANAGER
        - SR_MANAGER
        - USER

  # Principals in the following two roles can perform the `udpate` action
    - actions:
        - "update"
      effect: EFFECT_ALLOW
      roles:
        - SR_MANAGER
        - USER

  # Principals in any role can perform the `view` action
    - actions:
        - "view"
      effect: EFFECT_ALLOW
      roles:
        - "*"

  # These two actions can be performed by principals in the `JR_MANAGER` role
    - actions:
        - "approve"
        - "mark-as-paid"
      effect: EFFECT_ALLOW
      roles:
        - JR_MANAGER
Payment policy
apiVersion: api.cerbos.dev/v1
resourcePolicy:
  version: default
   # Defining the policy for the resource kind `payment`
  resource: payment

  # Principals in any role can perform the `view` action
  rules:
    - actions:
        - "view"
      effect: EFFECT_ALLOW
      roles:
        - "*"

  # Principals in any role can peform the  `execute` action(with one exception, see the rule below)
    - actions:
        - "execute"
      effect: EFFECT_ALLOW
      roles:
        - "*"

  # It the principal's role is `USER`, the principal is not allowed to perform the `execute` action
    - actions:
        - "execute"
      effect: EFFECT_DENY
      roles:
        - "USER"

  # Principals in any role can perform the `recall` action (with one exxeption, see the rule below)
    - actions:
        - "recall"
      effect: EFFECT_ALLOW
      roles:
        - "*"

  # Principals in the `USER` role cannot perform the `recall` action
    - actions:
        - "recall"
      effect: EFFECT_DENY
      roles:
        - "USER"

  # Principals in the following two roles can perform the `approva` action
    - actions:
        - "approve"
      effect: EFFECT_ALLOW
      roles:
        - SR_MANAGER
        - CFO
Report policy
apiVersion: api.cerbos.dev/v1
resourcePolicy:
  version: default
   # Defining the policy for the resource kind `report`
  resource: report

  rules:
  # Principals in these two roles can perform all the actions
    - actions:
        - "*"
      effect: EFFECT_ALLOW
      roles:
        - SR_MANAGER
        - CFO

  # Principals in any role can perform the `view` action
    - actions:
        - "view"
      effect: EFFECT_ALLOW
      roles:
        - "*"

  # Principals in these two roles can perform the `run` and `share` actions. `SR_MANAGER` is already covered by the `"*"` case above, but is shown here to demonstrate a many to many mapping.
    - actions:
        - "run"
        - "share"
      effect: EFFECT_ALLOW
      roles:
        - SR_MANAGER
        - JR_MANAGER
As you can see in these examples, you can model the policy rules from different perspectives.
Here is an example of focusing on an action and listing all the roles that can perform those actions.
  # Principals in the following three roles can perform the `create` action
    - actions:
        - "create"
      effect: EFFECT_ALLOW
      roles:
        - JR_MANAGER
        - SR_MANAGER
        - USER
Here is another example: focusing on a role and listing all the actions the role can perform
  # These two actions can be performed by principals in the `JR_MANAGER` role
    - actions:
        - "approve"
        - "mark-as-paid"
      effect: EFFECT_ALLOW
      roles:
        - JR_MANAGER
Here is an example of a combination of roles and actions that be grouped together.
  # Principals in these two roles can perform the `run` and `share` actions
    - actions:
        - "run"
        - "share"
      effect: EFFECT_ALLOW
      roles:
        - JR_MANAGER
        - SR_MANAGER
Lastly but not least at all, another example where one can give blanket permissions for a role, and then using the EFFECT_DENY cover the exceptions.
  # Principals in any role can peform the  `execute` action(with one exception, see the rule below)
    - actions:
        - "execute"
      effect: EFFECT_ALLOW
      roles:
        - "*"

  # It the principal's role is `USER`, the principal is not allowed to perform the `execute` action
    - actions:
        - "execute"
      effect: EFFECT_DENY
      roles:
        - "USER"
4. Use the Playground to test policies
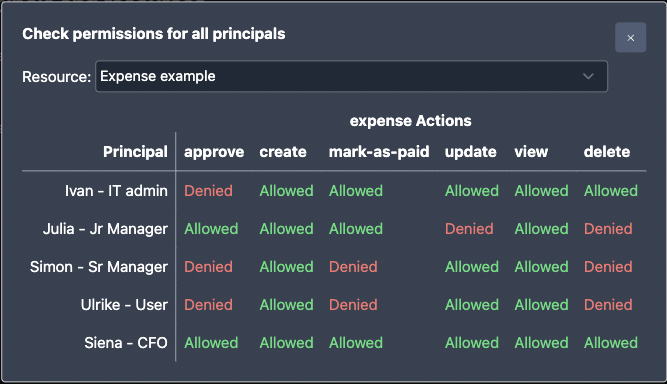
Now that we have the policy files defined above, we can load them to the playground to make sure they behave accordingly for each principal and resource type. As part of loading them up into the playground, we also created some sample principals and resources in the playground to test.
In this playground instance you can check all resources and actions for each principal by clicking on the following button.
The output should be identical to the matrix in the previous section.
5. Adopt a test-driven approach
Once you are happy with the policies and permissions, you should consider adding test cases. Having test cases makes sure that as you evolve your policies, you don't accidentally introduce something that breaks your access rules.
---
name: DemoExpenseExpenseTestSuite
description: Tests for verifying the RBAC actions

principals:
  it_admin:
    id: ivan
    roles:
      - IT_ADMIN

  jr_manager:
    id: julia
    roles:
      - JR_MANAGER

  sr_manager:
    id: simon
    roles:
      - SR_MANAGER

  user:
    id: ulrike
    roles:
      - USER

  cfo:
    id: siena
    roles:
      - CFO

resources:
  Account1:
    id: account1
    kind: account
  Expense1:
    id: expense1
    kind: expense
  Payment1:
    id: payment1
    kind: payment
  Report1:
    id: report1
    kind: report

tests:
  - name: Expense actions
    input:
      principals:
        - it_admin
        - jr_manager
        - sr_manager
        - user
        - cfo

      resources:
        - Expense1

      actions:
        - create
        - update
        - view
        - delete
        - approve
        - mark-as-paid

    expected:
      - principal: it_admin
        resource: Expense1
        actions:
          create: EFFECT_ALLOW
          update: EFFECT_ALLOW
          view: EFFECT_ALLOW
          delete: EFFECT_ALLOW
          approve: EFFECT_DENY
          mark-as-paid: EFFECT_ALLOW

      - principal: jr_manager
        resource: Expense1
        actions:
          create: EFFECT_ALLOW
          update: EFFECT_DENY
          view: EFFECT_ALLOW
          delete: EFFECT_DENY
          approve: EFFECT_ALLOW
          mark-as-paid: EFFECT_ALLOW

      - principal: sr_manager
        resource: Expense1
        actions:
          create: EFFECT_ALLOW
          update: EFFECT_ALLOW
          view: EFFECT_ALLOW
          delete: EFFECT_DENY
          approve: EFFECT_DENY
          mark-as-paid: EFFECT_DENY

      - principal: user
        resource: Expense1
        actions:
          create: EFFECT_ALLOW
          update: EFFECT_ALLOW
          view: EFFECT_ALLOW
          delete: EFFECT_DENY
          approve: EFFECT_DENY
          mark-as-paid: EFFECT_DENY

      - principal: cfo
        resource: Expense1
        actions:
          create: EFFECT_ALLOW
          update: EFFECT_ALLOW
          view: EFFECT_ALLOW
          delete: EFFECT_ALLOW
          approve: EFFECT_ALLOW
          mark-as-paid: EFFECT_ALLOW
These test files can be saved alongside your policies and be made part of your CI/CD pipeline checks. For more details on how to run them, please see the unit testing documentation.
6. Test how Cerbos API would behave from your code
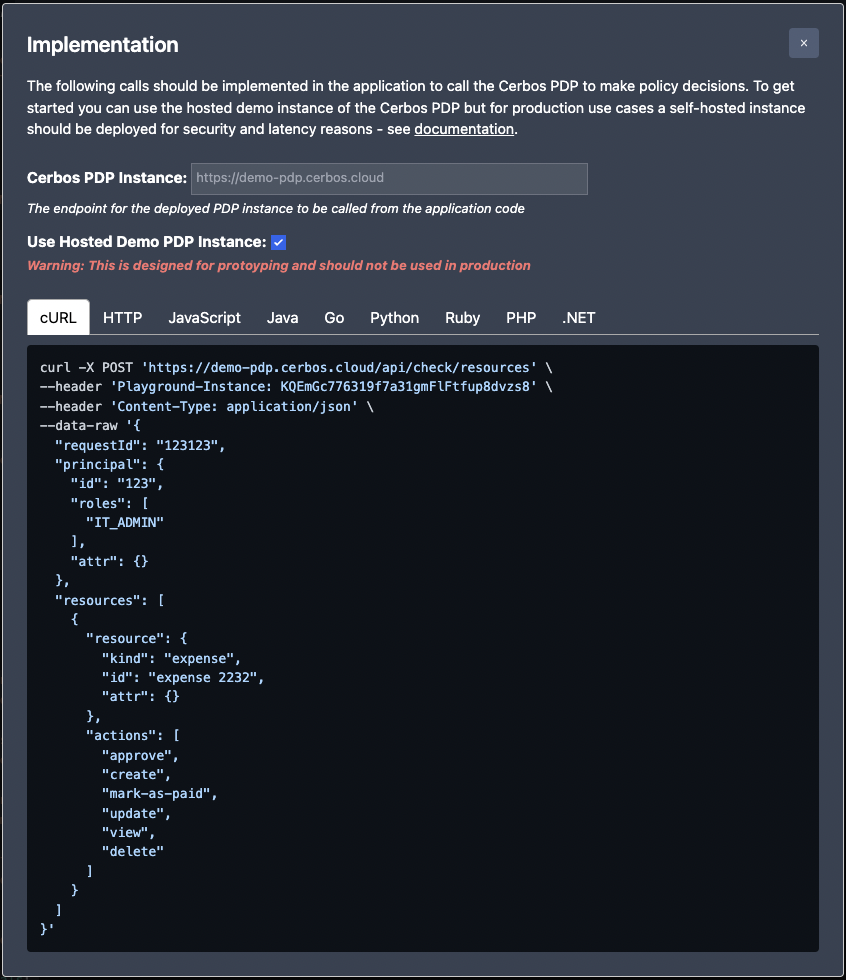
Now that we built the policies, validated them and loaded them into the playground, we can use the playground as a PDP from our code for testing purposes.
WARNING: This is only for development and quick testing purposes. Your production code should not rely on the Cerbos Playground as we do not provide any availability, compatibility or latency guarantees.
The playground displays sample code in most of the popular programming languages on how to quickly connect to Cerbos to get access decisions. Just click on the Try the API button and follow the instructions to use the code samples.
7. Enhance your policies to take advantage of ABAC
Previously we have only covered whether principals in a given role can perform certain actions or not. However, sometimes life is not that simple. Certain conditions also need to be considered. The following modified matrix shows some examples of attribute based modifications to the policies.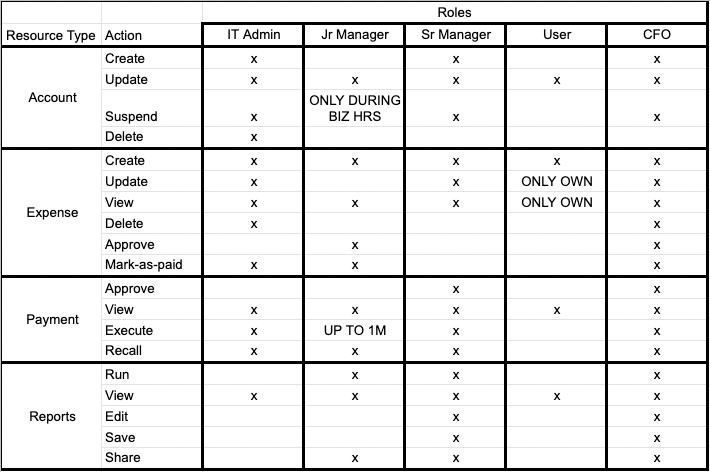
- Someone in a
USERrole can only see and update their own expenses
  # Principals in the following two roles can perform the `udpate` action
  - actions:
      - "update"
    effect: EFFECT_ALLOW
    roles:
      - SR_MANAGER
      - USER

# Principals in any role can perform the `view` action
  - actions:
      - "view"
    effect: EFFECT_ALLOW
    roles:
      - "*"

# Principals in the `USER` role can only `view` and `update` their own expenses.
# Therefore, DENY if the principal's id does not match the owner id
  - actions:
      - "view"
      - "update"
    effect: EFFECT_DENY
    roles:
      - "USER"
    condition:
      match:
        any:
          of:
            - expr: R.attr.owner != P.id
JR_MANAGERcannot suspend accounts outside of business hours
  # Principals JR_MANAGER role can only run `suspend` action between 9am and 5pm during weekdays
  - actions:
      - "suspend"
    effect: EFFECT_ALLOW
    roles:
      - JR_MANAGER
    condition:
      match:
        all:
          of:
            # Based on a 24 hour clock
            - expr: now().getHours() >= 9 && now().getHours() <= 17
            # 0 is Sunday, and 6 is Saturday
            - expr: now().getDayOfWeek() > 0 && now().getDayOfWeek() < 6
- Principals in
JR_MANAGERrole cannot execute payments over $1 million
  # Principals in any role can peform the  `execute` action(with one exception, see the rule below)
  - actions:
      - "execute"
    effect: EFFECT_ALLOW
    roles:
      - "*"

# If the principal's role is `USER`, the principal is not allowed to perform the `execute` action
  - actions:
      - "execute"
    effect: EFFECT_DENY
    roles:
      - "USER"

# Principals in `JR_MANAGER` role have a 1m limit when executing payments
  - actions:
      - "execute"
    effect: EFFECT_DENY
    roles:
      - "JR_MANAGER"
    condition:
      match:
        any:
          of:
            - expr: R.attr.amount > 1000000
To see the full policies for the ABAC examples above, please see the following playground instance
8. Make contextual role decisions via "Derived Roles"
Derived Roles in Cerbos allows you to assign fine-grained, request-scoped roles to users based on context. For example, the roles stored in your directory service would not contain an owner role because ownership depends on which resource the principal is trying to access. However, knowing whether a principal is the owner of a record is really important when making access control decisions.
In this playground instance we further extract the ownership role decision to the derived_roles.yaml file.
apiVersion: api.cerbos.dev/v1
derivedRoles:
  name: example_derived_roles
  definitions:
    - name: OWNER
      parentRoles:
        - USER
      condition:
        # Examples https://docs.cerbos.dev/cerbos/latest/policies/conditions.html
        match:
          expr: R.attr.owner == P.id
    - name: MANAGERS
      parentRoles:
        - IT_ADMIN
        - JR_MANAGER
        - SR_MANAGER
        - CFO
The above configuration indicates that if a principal has a role USER in the request and the owner attribute of the resource matches the principal's id, then the principal assumes the OWNER role.
It also shows a grouping of other roles in to a new derived role of MANAGERS
With this derived role, we can have the following in the expense.yaml
  # Principals in the following two roles can perform the `udpate` action
    - actions:
        - "update"
      effect: EFFECT_ALLOW
      roles:
        - SR_MANAGER
      derivedRoles:
        - OWNER

  # Principals in any role can perform the `view` action
    - actions:
        - "view"
      effect: EFFECT_ALLOW
      derivedRoles:
        - OWNER
        - MANAGERS
If you plan to have many repeated conditional checks in your regular policy files, they can mostly be abstracted out to a derived role and be centrally updated.
9. Deploy Cerbos in your local and production environments
Cerbos can be deployed in many different configurations to your development and production environments: as a side car, as a kubernetes service, a binary on a VM. Please see all the different options for storing your policy files and deployment options.
10. Incrementally adopt Cerbos
You do not need to rip and replace everything; Cerbos can be incrementally introduced and adopted to your product.
Looking and analyzing all of the different resource types and replacing their permission checks can be overwhelming. Therefore there is no harm in starting to implement Cerbos one section of your application at a time.
We recommend to start with one resource or a screen flow at a time and start exporting its checks to Cerbos without changing the rest of your application. Once that section is complete, move on to the next, and the next.
Check out part two of our blog series on policy-writing best practices: Supercharging your policy rules with self-service custom roles.
If you have any questions about the steps here or how they may apply to your project, please feel free to either ask questions in our Slack Community or book a free workshop with our team.
To explore mapping business requirements to authorization policy for other domains - check out our blogs specific to the fintech space, HR systems, insurance, aviation and MedTech.
FAQ
Book a free Policy Workshop to discuss your requirements and get your first policy written by the Cerbos team
Recommended content
Mapping business requirements to authorization policy
eBook: Zero Trust for AI, securing MCP servers

Experiment, learn, and prototype with Cerbos Playground
eBook: How to adopt externalized authorization

Framework for evaluating authorization providers and solutions

Staying compliant – What you need to know
Subscribe to our newsletter
Join thousands of developers | Features and updates | 1x per month | No spam, just goodies.
Authorization for AI systems
By industry
By business requirement
Useful links
What is Cerbos?
Cerbos is an end-to-end enterprise authorization software for Zero Trust environments and AI-powered systems. It enforces fine-grained, contextual, and continuous authorization across apps, APIs, AI agents, MCP servers, services, and workloads.
Cerbos consists of an open-source Policy Decision Point, Enforcement Point integrations, and a centrally managed Policy Administration Plane (Cerbos Hub) that coordinates unified policy-based authorization across your architecture. Enforce least privilege & maintain full visibility into access decisions with Cerbos authorization.
