
(See part 1 for an introduction to using AWS Cognito with Cerbos)
Here in Part 2, we dig deeper into an end-to-end implementation of a user pool and show how it interacts with our Cerbos + FastAPI application. The code for this demo can be found here.
Prerequisites
This demo assumes that you have the following set up:
- Your AWS credentials configured locally to allow you to access your AWS account programatically. Instructions can be found here.
- The AWS CLI installed and configured.
- Docker running locally.
Creating a Cognito user pool
The first thing we'll need to do is create an AWS Cognito user pool. Sign in to the AWS Console, and navigate here. Select the option to Create user pool.
Choose a sign-in option and click Next:

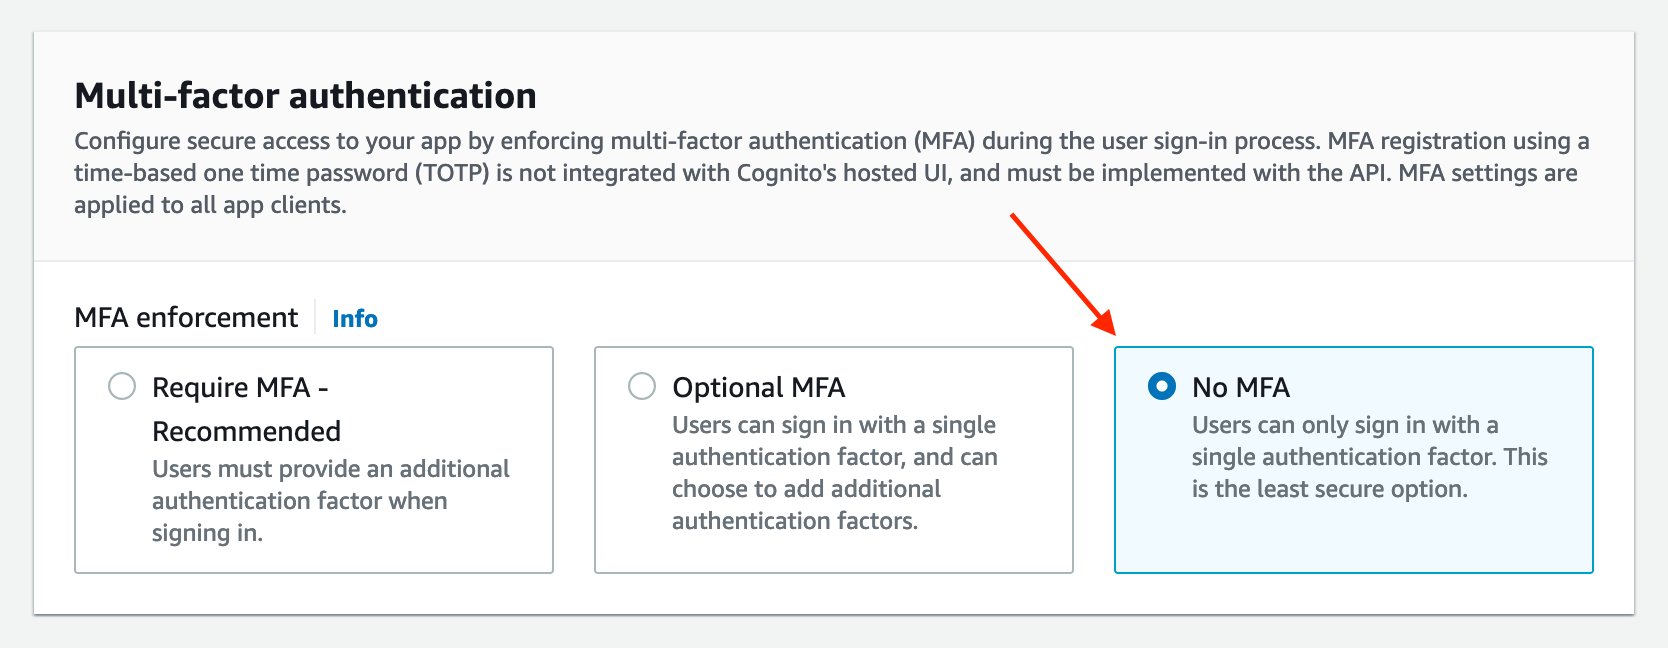
Scroll down to "Multi-factor authentication", select No MFA. Then scroll to the bottom and click Next:
We can leave the "Configure sign-up experience" section as is, so scroll to the bottom and click Next.
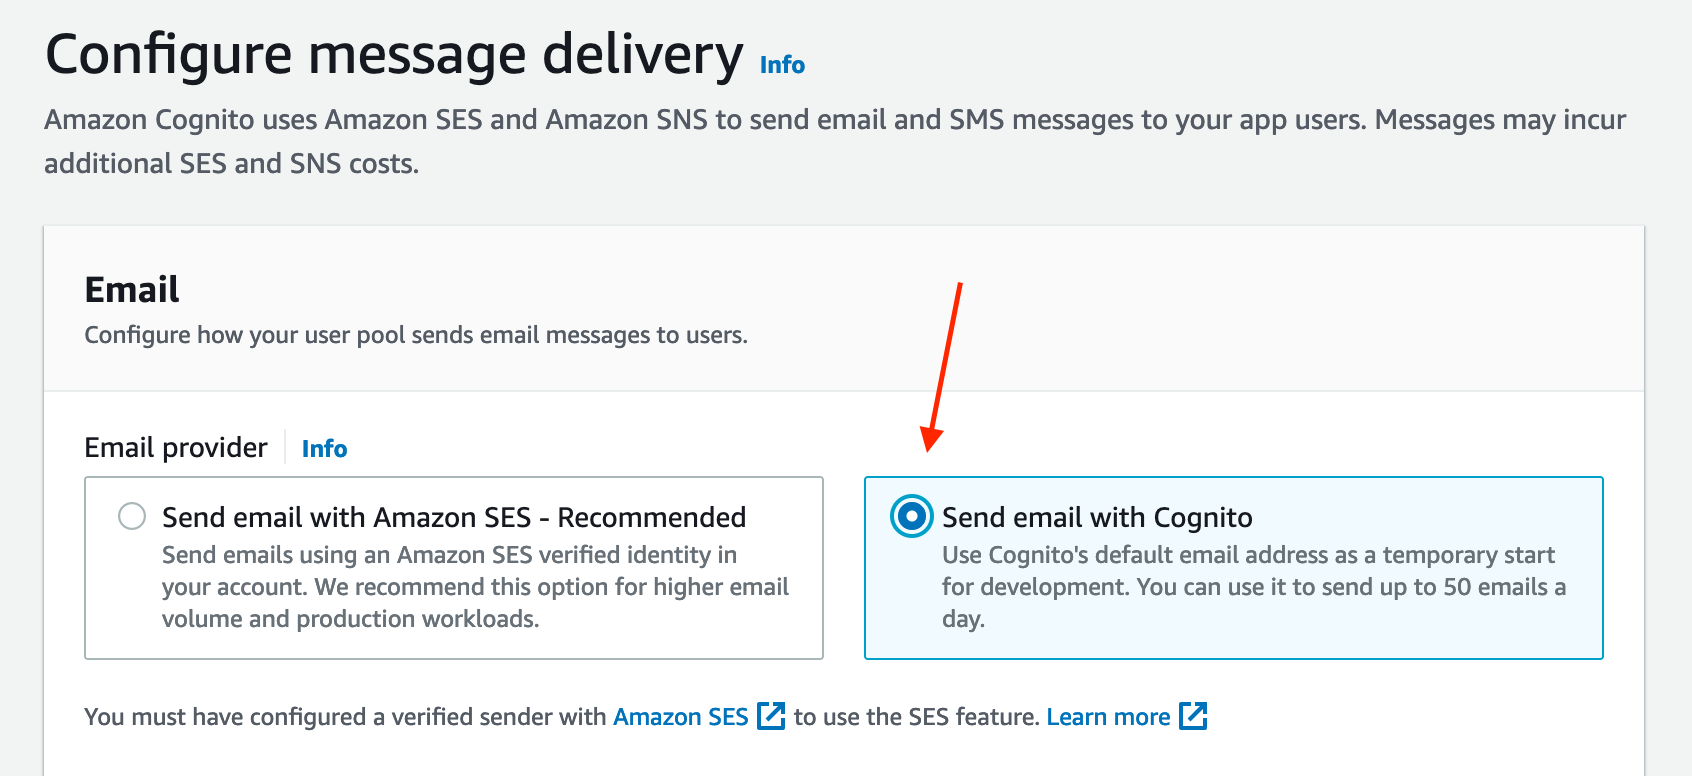
In "Configure message delivery", click Send email with Cognito. Under real production scenarios, you would likely opt to configure Amazon SES, but for testing purposes in this demo, Cognito is fine. Click Next:
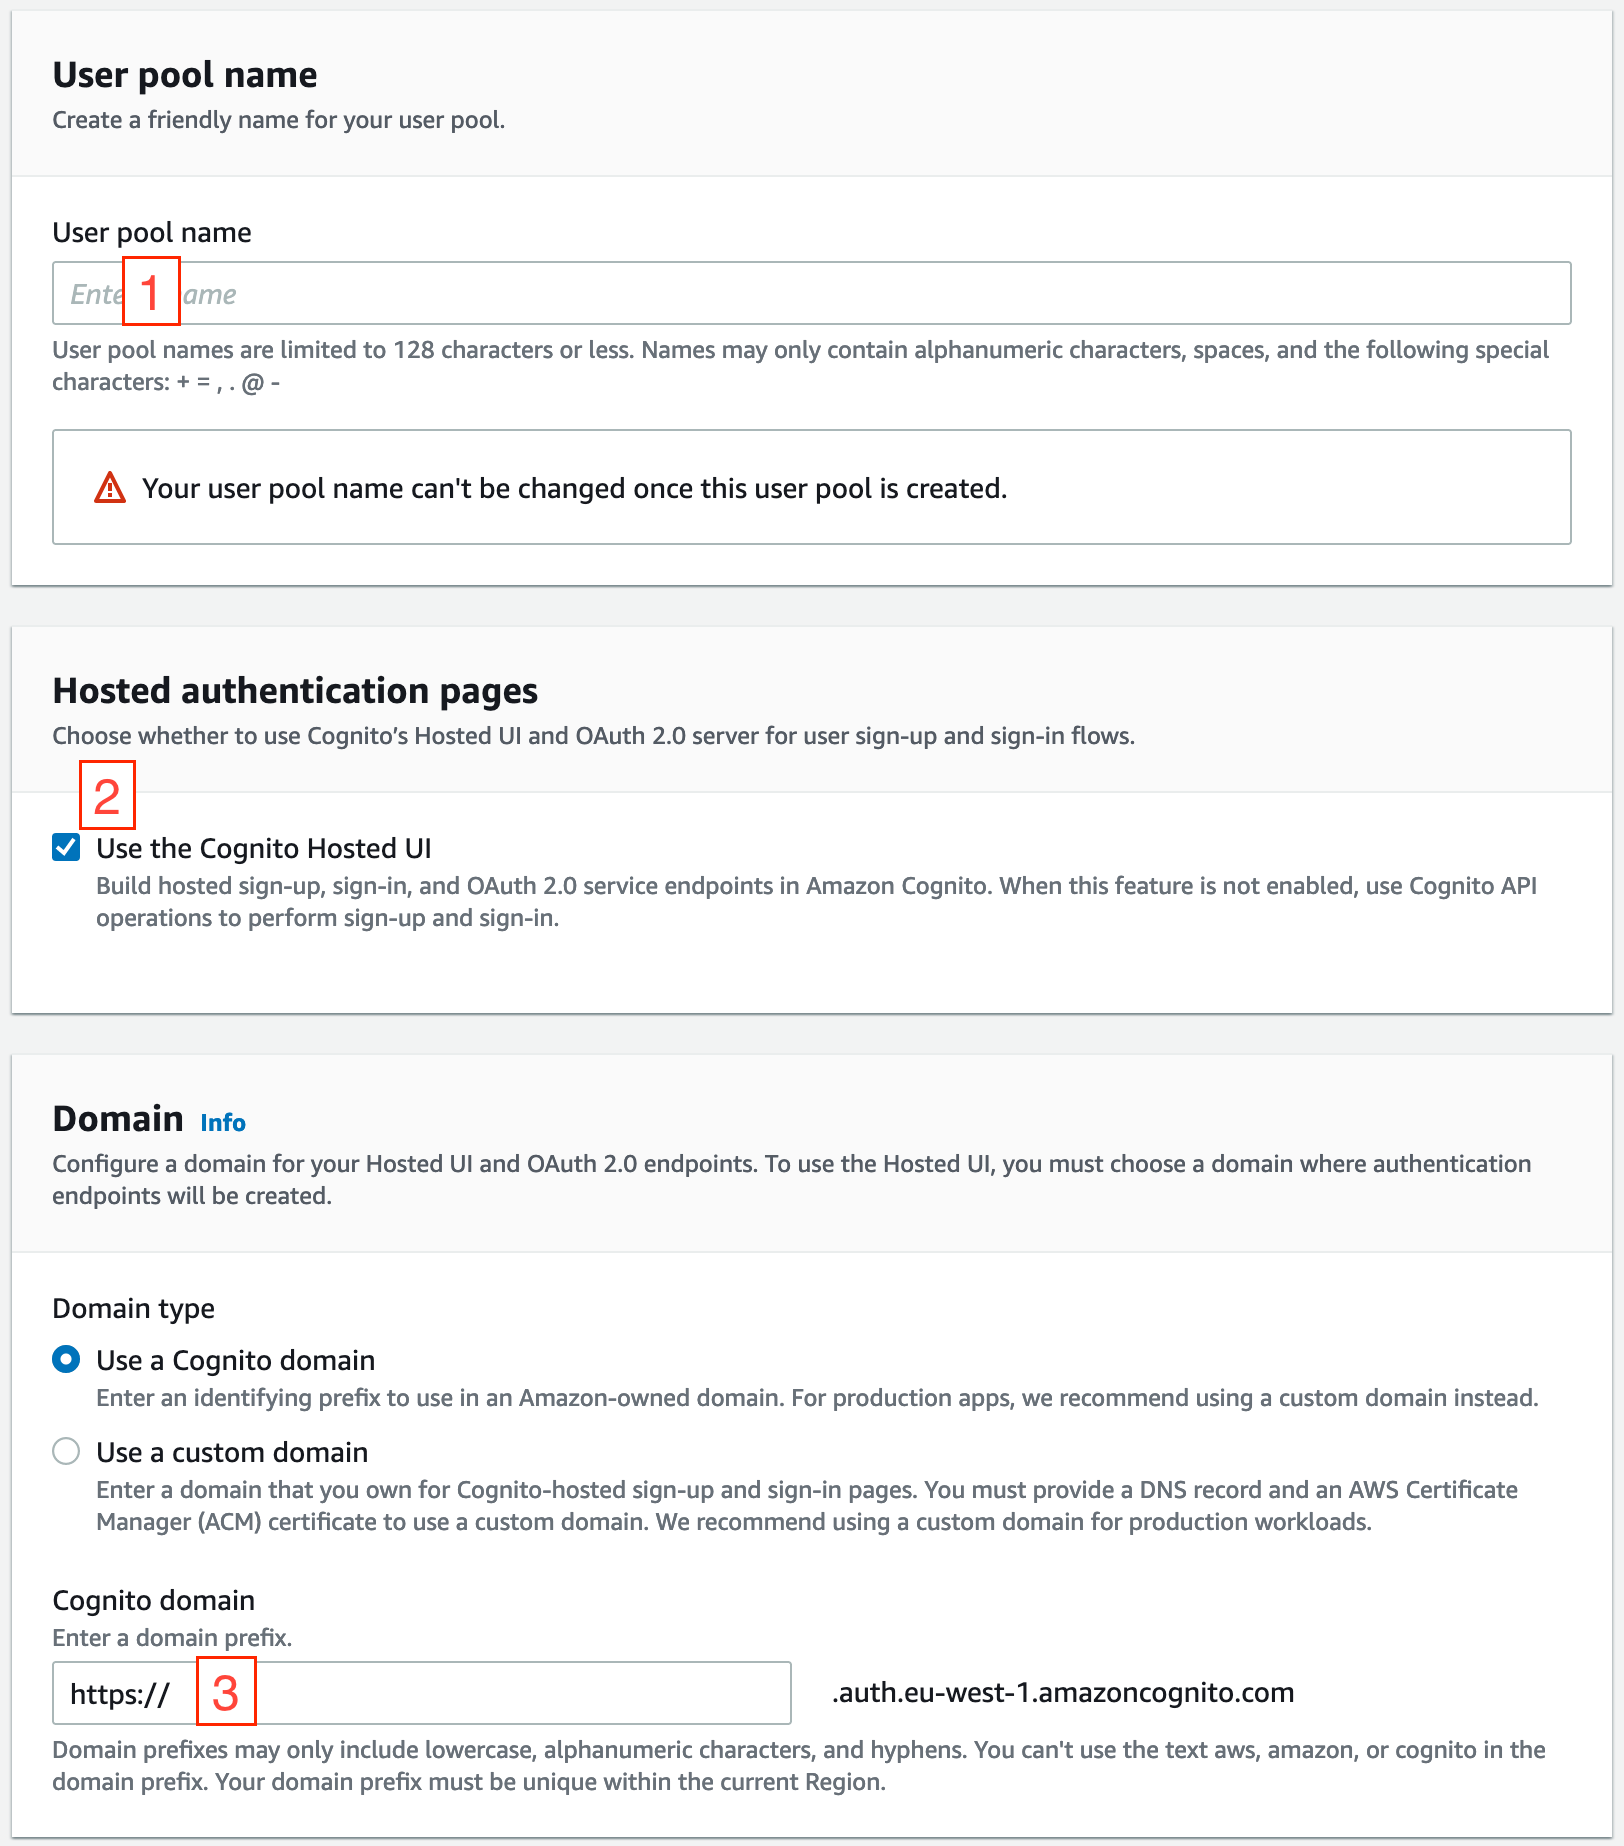
In the "Integrate your app" section, we need to set a few fields:
- Enter a pool name. Copy it, as we need it for the Cognito Domain (3)
- OPTIONAL: Enable the Cognito Hosted UI.
- OPTIONAL: Enter the copied pool name (e.g.
https://pool-name).
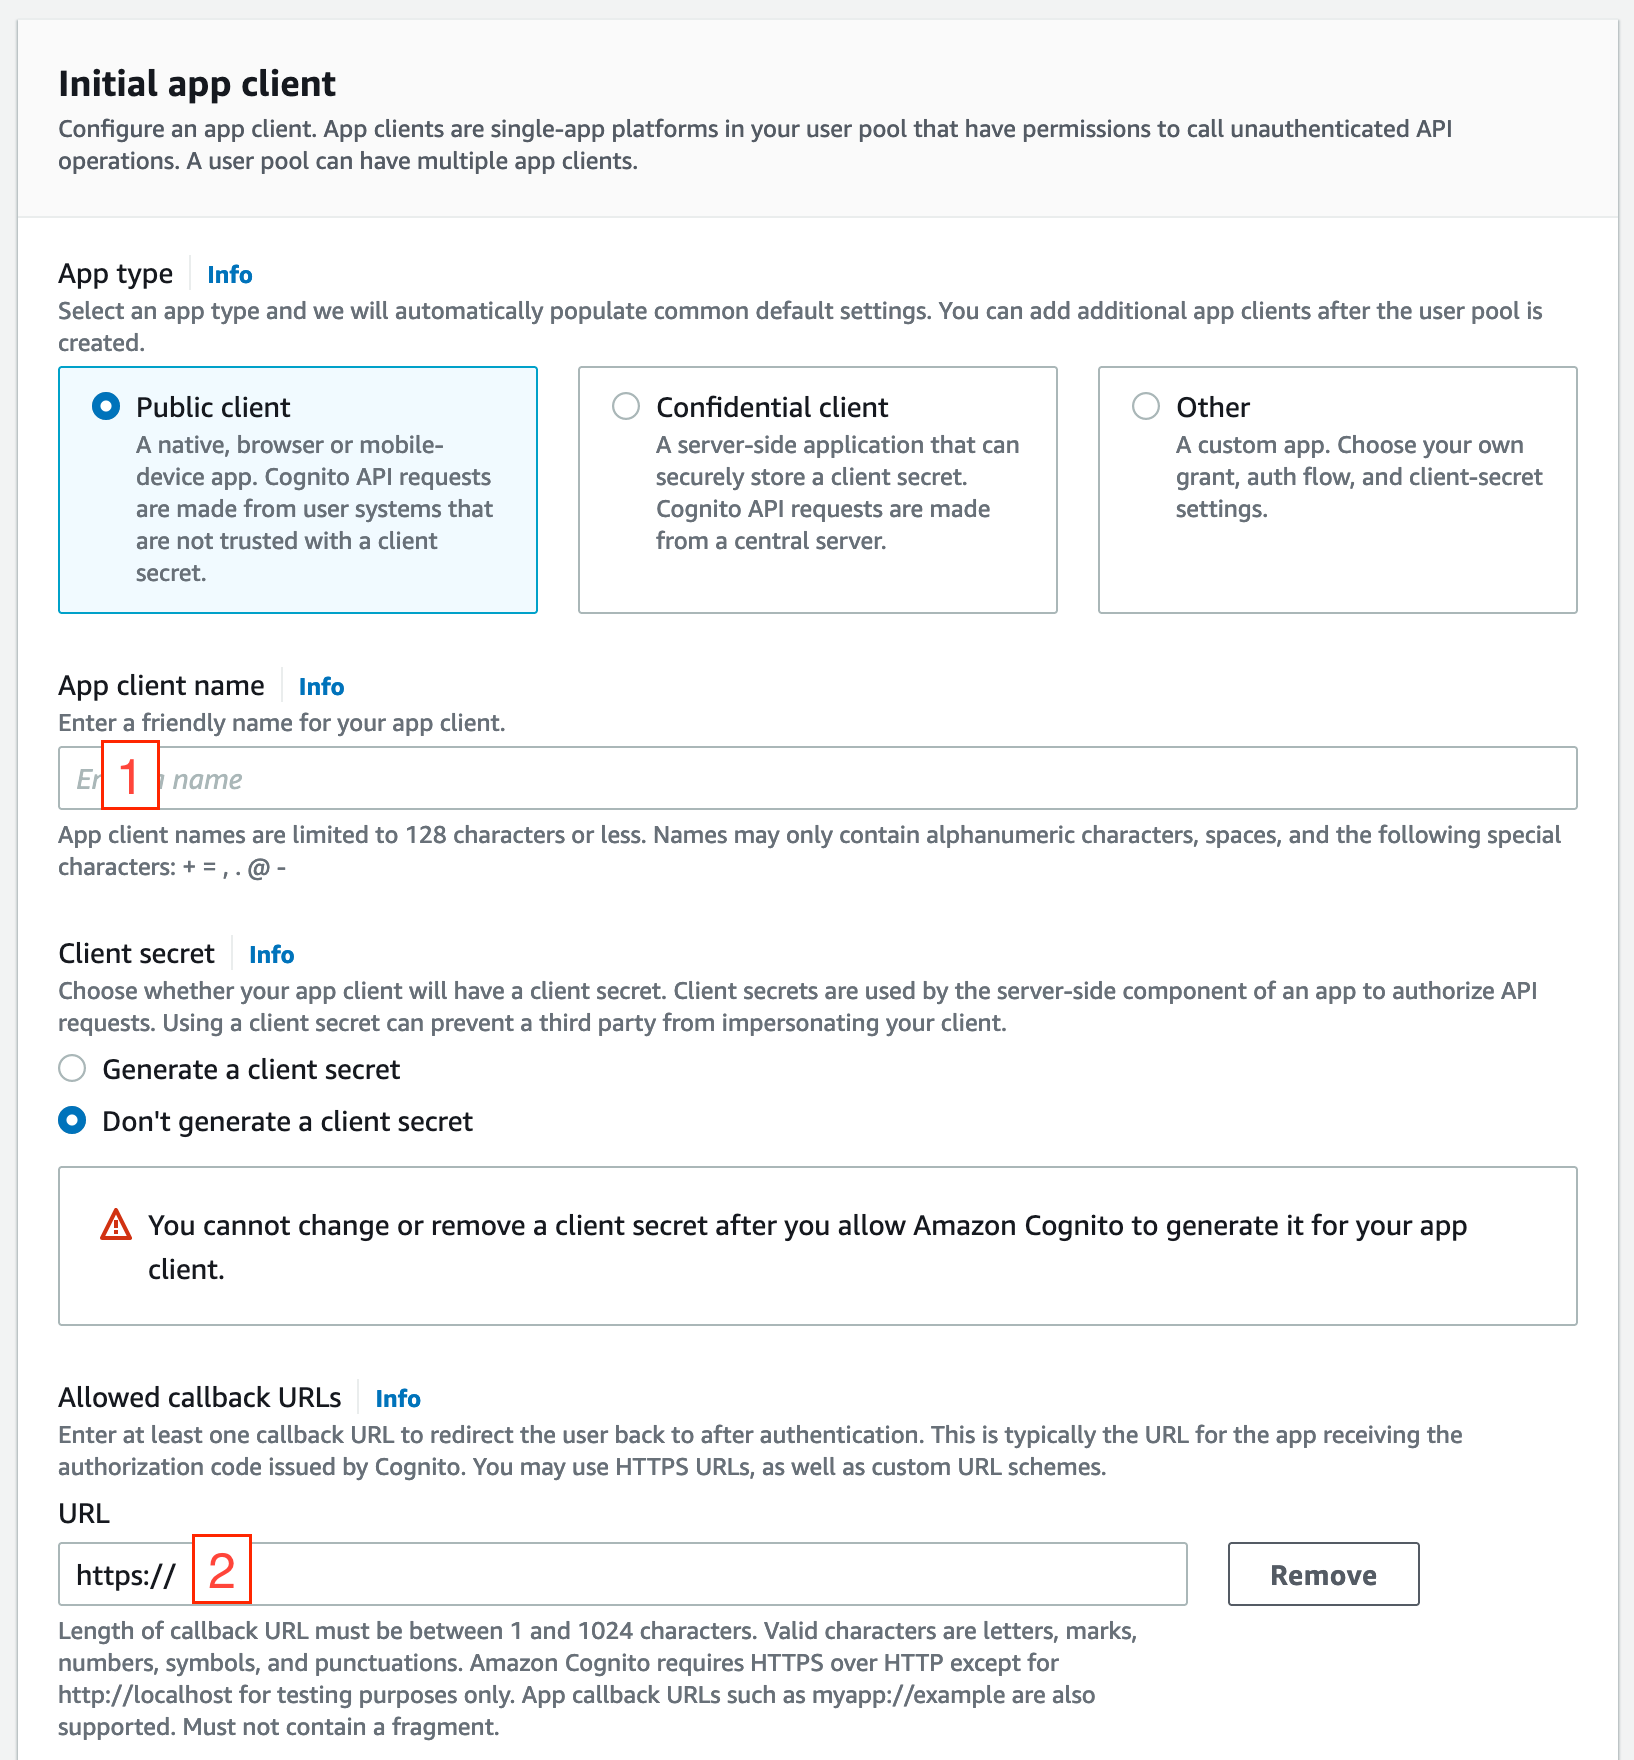
- In the "Initial app client" section, enter an App client name (this can be anything).
- For "Allowed callback URLs", under the "URL" section, enter
http://localhost:8000/callback(NOTE: the scheme is "http" rather than "https"). This is the address and port that our local development app will be running on.
Expand the "Advanced app client settings" section, scroll to the bottom, and click Add sign-out URL:

In the expanded section, replace the URL with http://localhost:8000 (NOTE: http again). Scroll to the bottom and click Next.
In the "Review and create" section, scroll to the bottom, and click Create user pool.
Adding roles
Cerbos roles
In Cerbos, we defined a simple set of policies in this file for a resource of type "contact". You can see two roles: "admin" and "user", and you can see the different rules that have been applied to each.
Simple ones, e.g. access for both roles to "read" from or "create" new resources:
  rules:
    - actions: ["read", "create"]
      effect: EFFECT_ALLOW
      roles:
        - admin
        - user
And more elaborate conditional roles, such as this one which gives full access to a "user" providing they are the owner of the specific resource (note: the rule applied within the condition section).
  rules:
    ...
    - actions: ["update", "delete"]
      effect: EFFECT_ALLOW
      roles:
        - user
      condition:
        match:
          expr: request.resource.attr.owner == request.principal.id
Cognito user pool groups
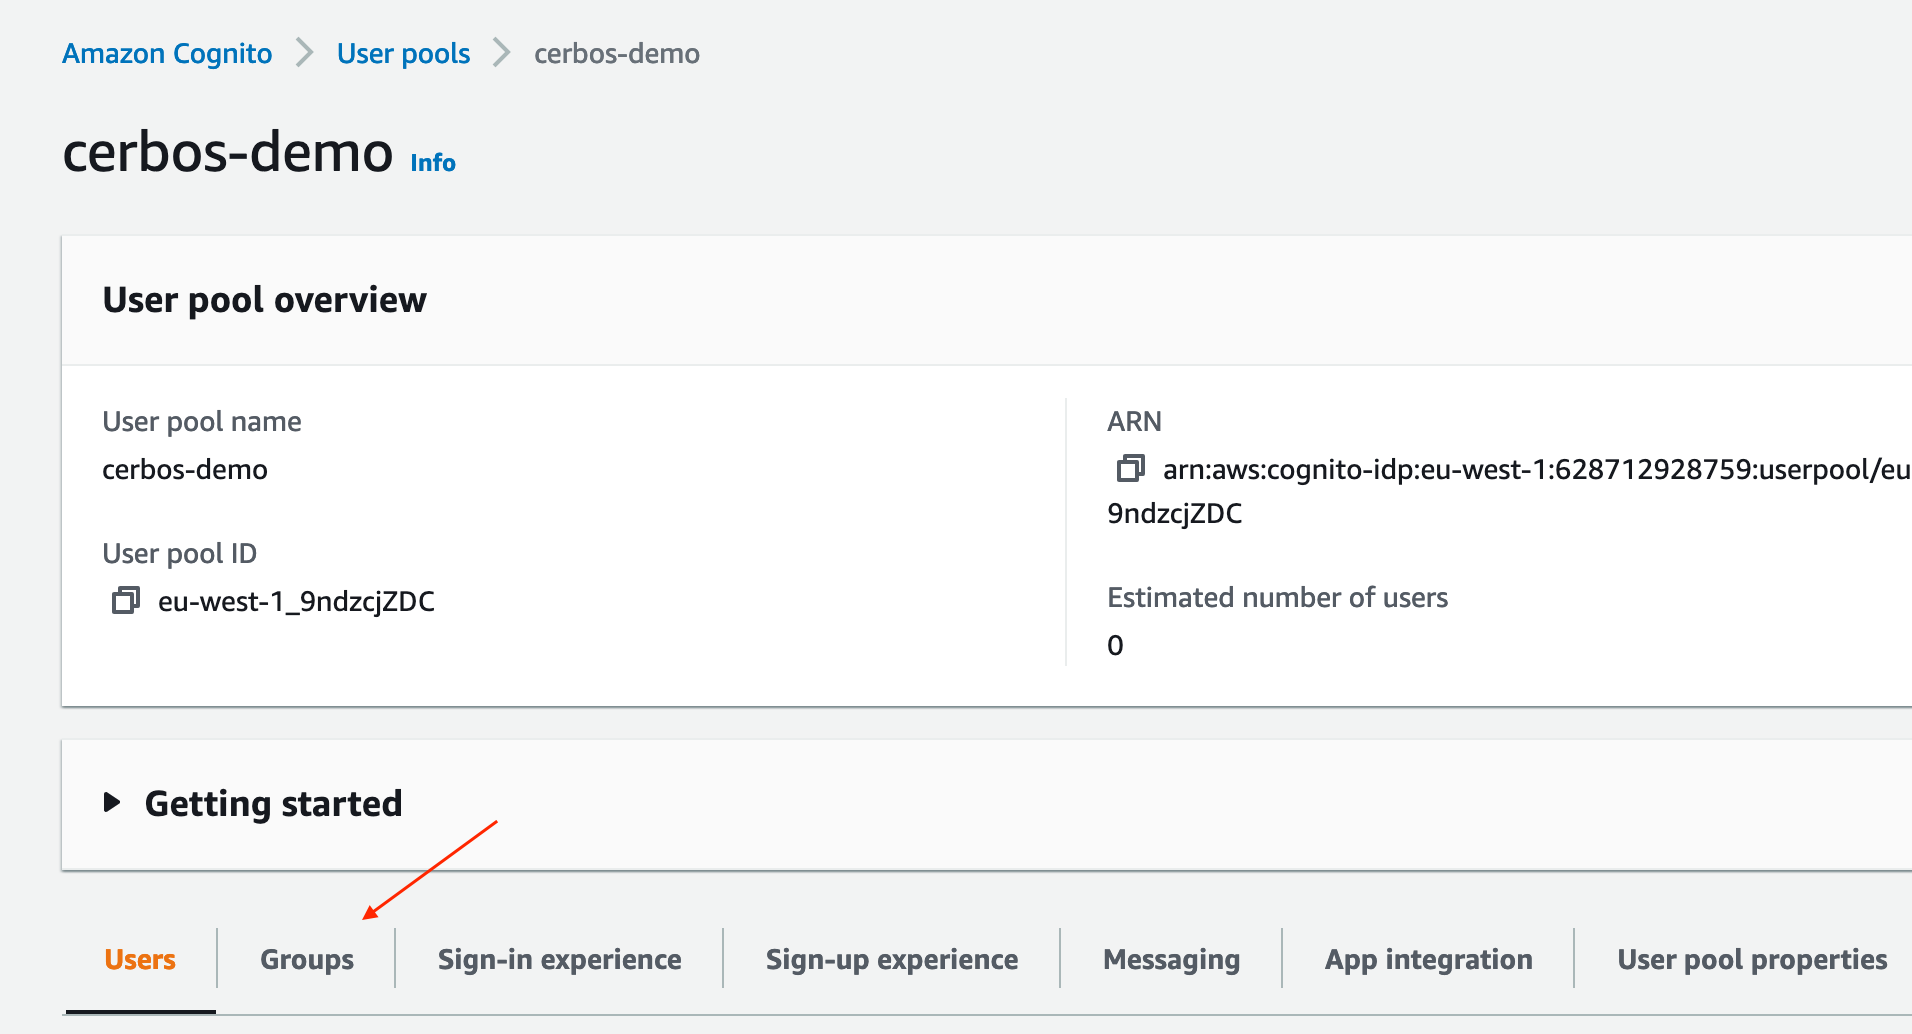
We can create these roles within our user pool by creating simple groups. In our newly created pool, navigate to the main page, and click on the Groups tab. In there, click Create group:
We only need to add a name for this demo, so in the following section, write "admin" in the Group name section, and then scroll to the bottom and click Create group. Repeat for the "user" role.
Creating users
Now we have a user pool and some groups configured, we need some users. The quickest way to achieve this is via the AWS CLI.
Before we run the commands, we need to retrieve the pool ID. If you head back to the pool overview page, you can find the User pool ID at the top:
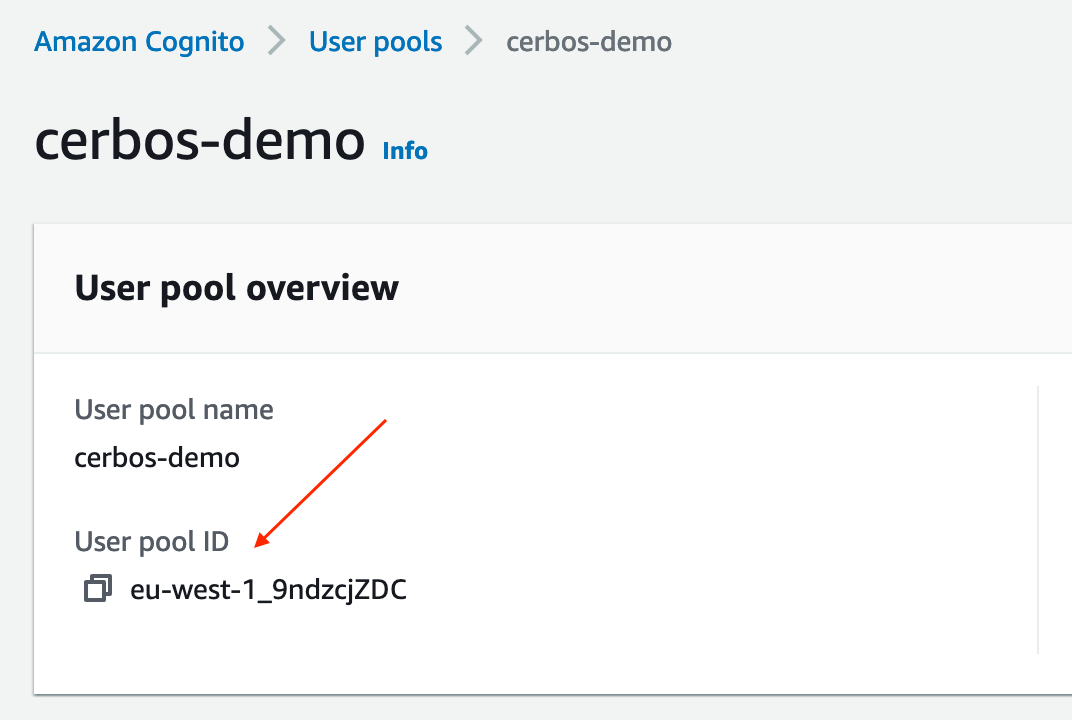
Now, open a terminal, and run the following command, making sure to replace pool ID and the email accordingly:
aws cognito-idp admin-create-user --user-pool-id {USER_POOL_ID} --username {EMAIL}
After creation, the user will be in the Force change password state. To override this, run the following command, making sure to replace the password accordingly. Note: the password must abide by whatever password rules were added during pool creation (the default must have at least one of each of lower case letters, upper case letters, numbers, and special characters):
aws cognito-idp admin-set-user-password --user-pool-id {USER_POOL_ID} --username {EMAIL} --password {PASSWORD} --permanent
You can repeat this however many times you want to create any additional users.
Adding users to groups
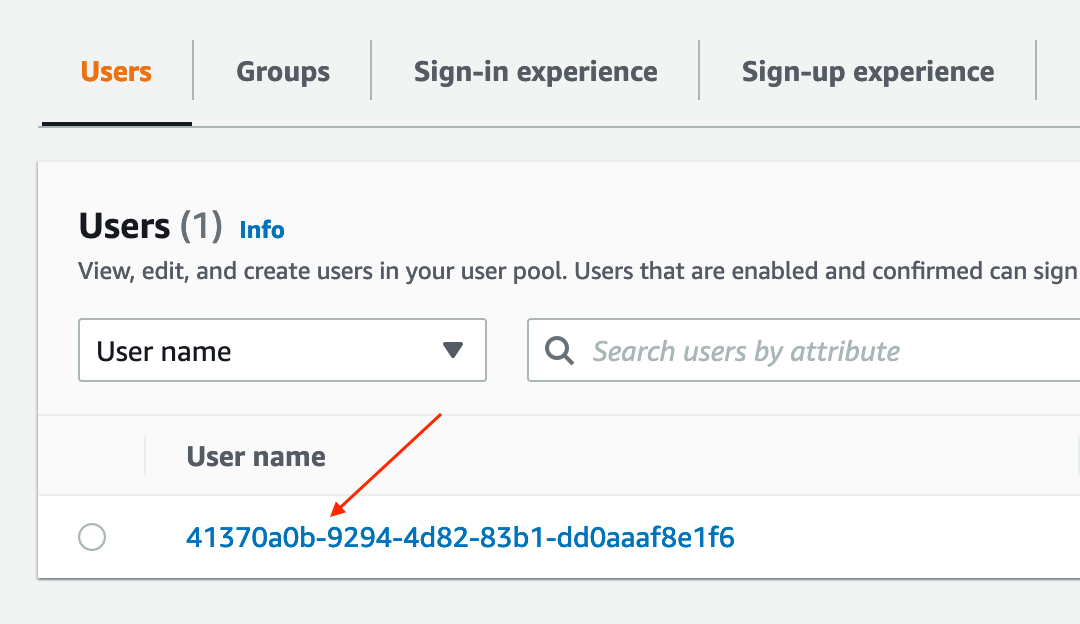
Now we have some users, we can add them to our user pool groups. Navigate to the "Users" tab from the main user pool page, and click on the user name for one of your newly created users:
Scroll to the "Group memberships" section at the bottom, and click Add user to a group:
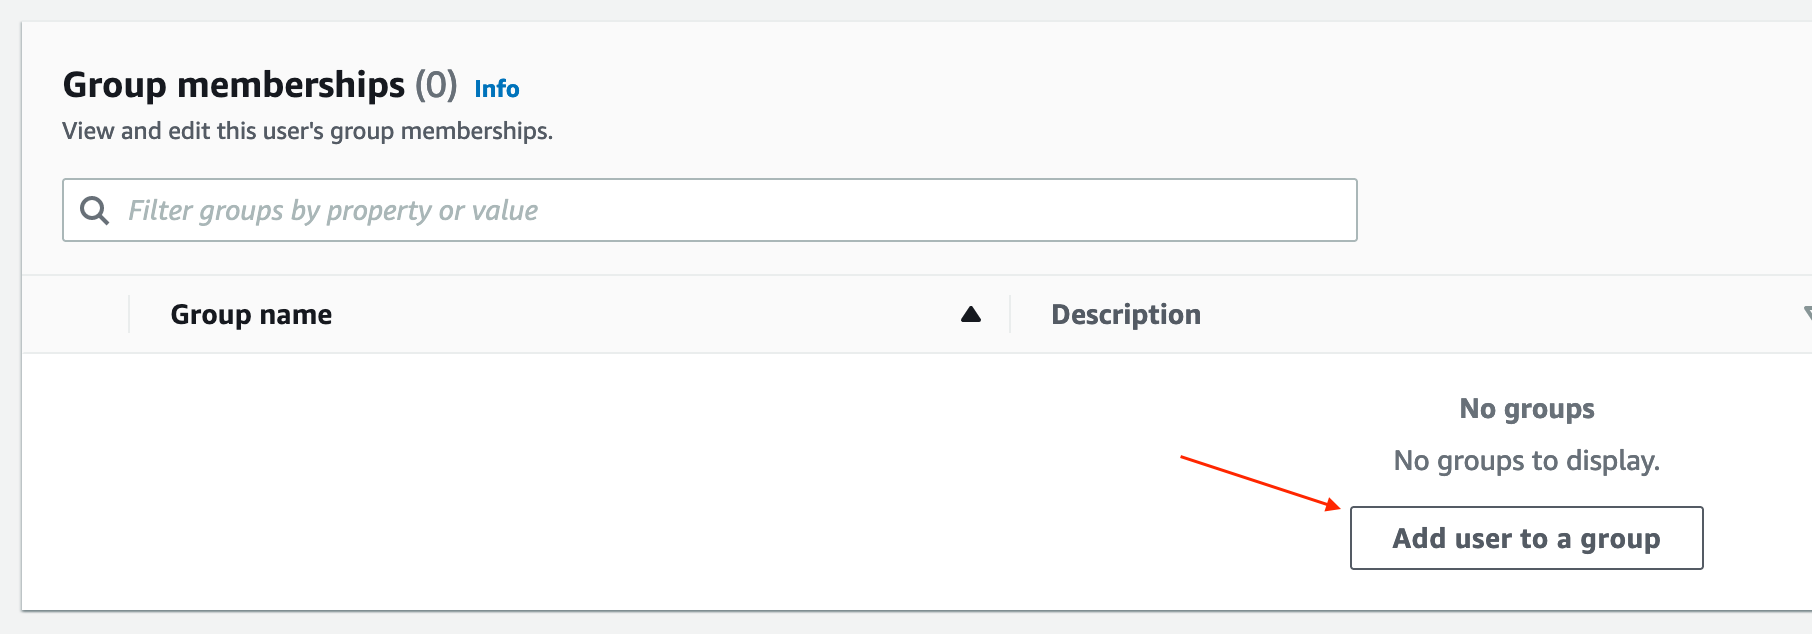
Then, select the desired group, and click Next. Repeat to heart's content.
Firing up the app
Open up a terminal, and clone the repository:
git clone git@github.com:cerbos/python-cognito-cerbos.git
cd python-cognito-cerbos
Install the project dependencies:
./pw install
Open a new terminal window, and from project root, run the following to start an instance of the Cerbos PDP (note: Docker must be running at this point).
cd cerbos
./start.sh
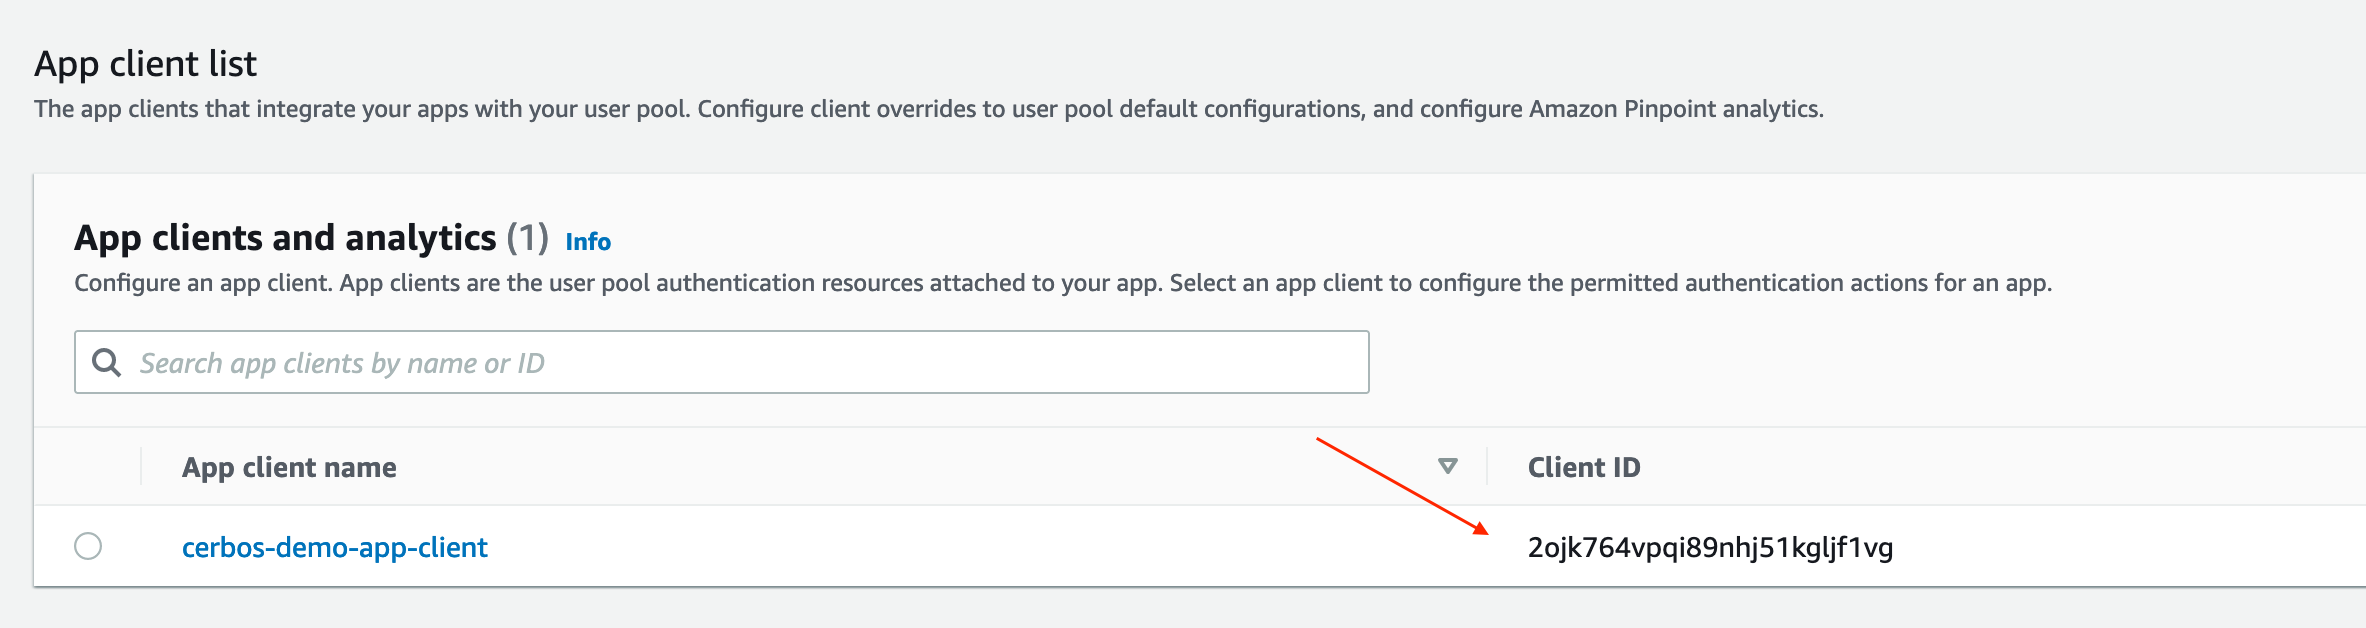
In the first terminal window, once the dependencies have finished installing, we want to set some environment variables. Before we can, we need to retrieve the app client ID parameter from the AWS console.
From the pool overview page, go to the "App integration" tab, scroll right to the bottom, and grab the ID from the "App client list":
Now we have that, in our terminal window, we can set the following environment variables (note: You may have to change the default region if you created your pool somewhere other than in Ireland):
export AWS_COGNITO_POOL_ID={USER_POOL_ID}
export AWS_COGNITO_CLIENT_ID={APP_CLIENT_ID}
export AWS_DEFAULT_REGION=eu-west-1
And then we can start the app:
./pw demo
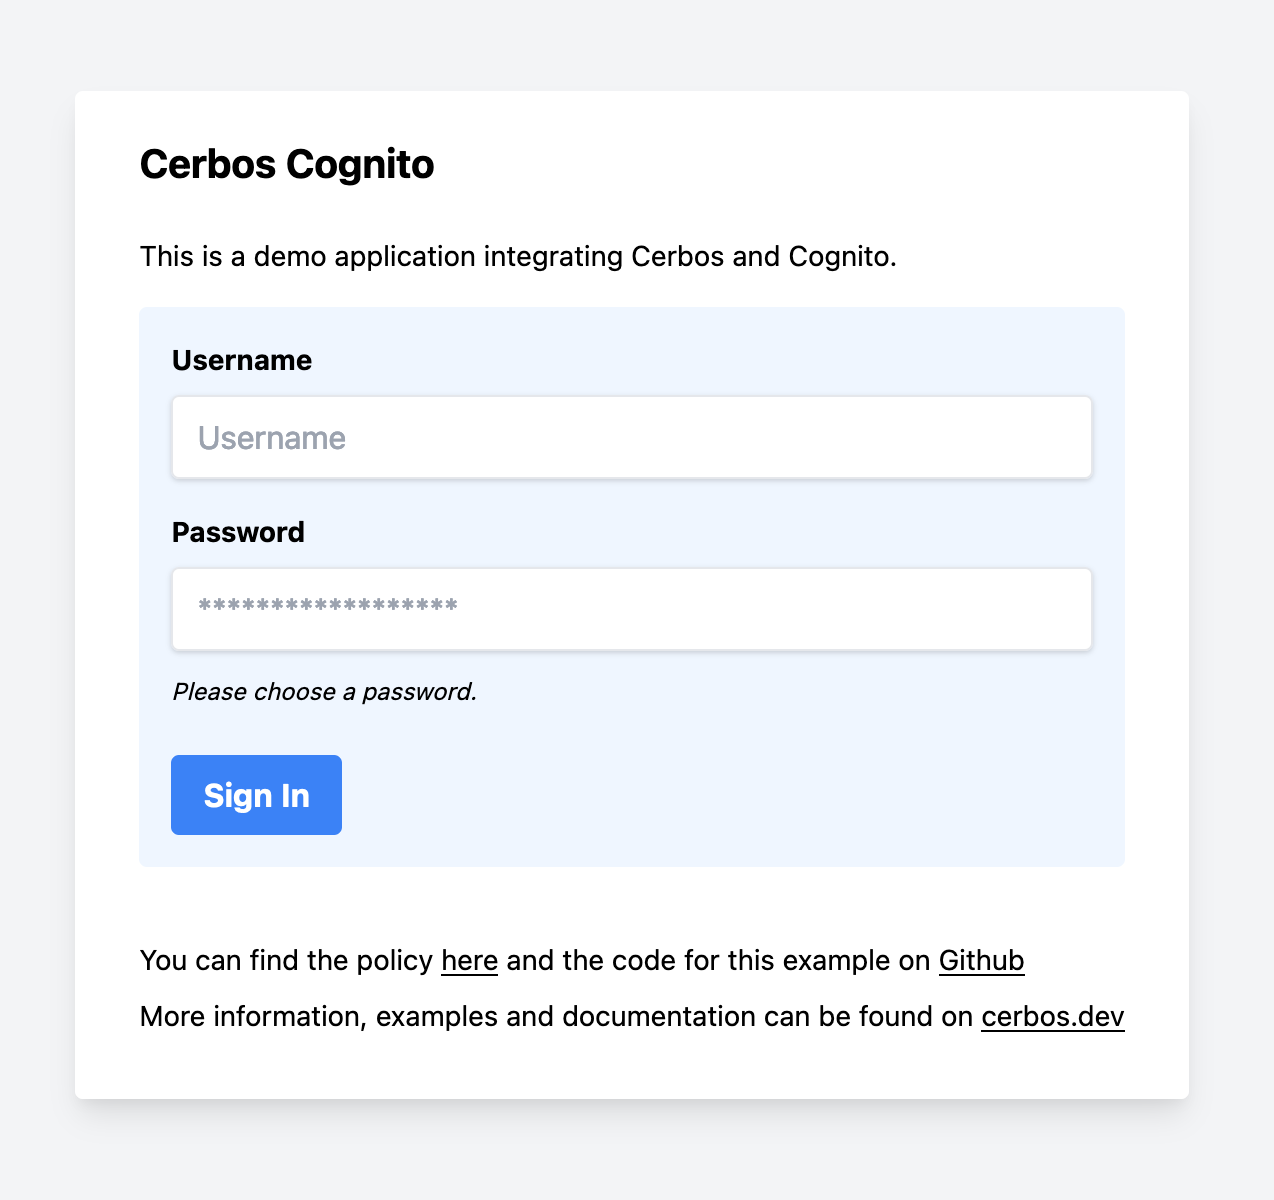
Once it's finished starting up, open a browser, navigate to localhost:8000, et voila! You should see your login page 🎉
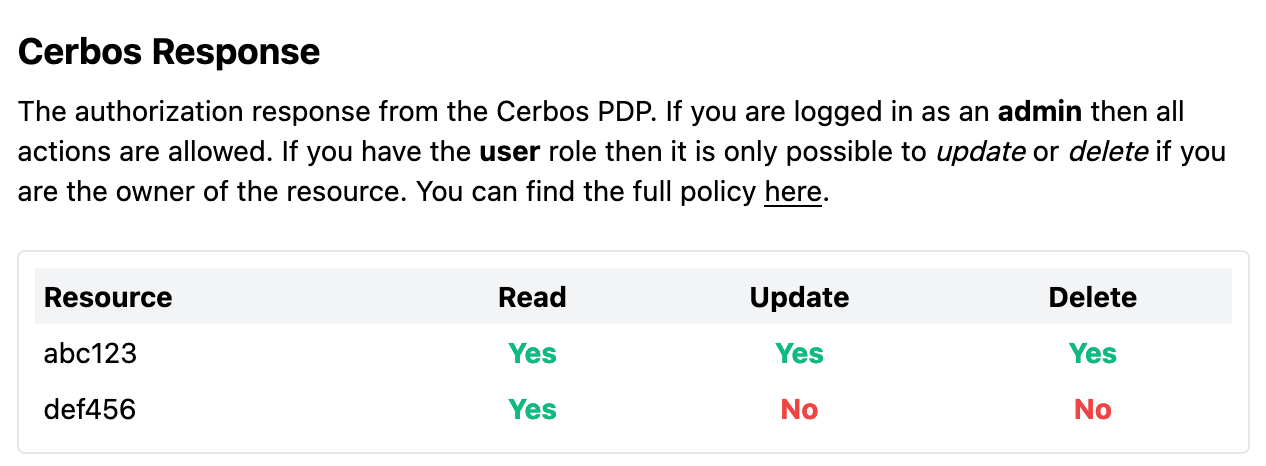
Try logging in as one of your users. There will be a lot of information displayed, but if you look at the "Cerbos Response" section on the right, you'll see which resources the current user has access to:
To make sense of this, it's worth taking a look at the code...
The code
The code is split between two basic modules: main.py, where (primarily) the routes are defined for our API, and jwt.py where we house token deserialization/validation related logic and data structures.
User authentication
Open your favourite text editor, and navigate to main.py.
When you logged in above, the code that handled the request was the function login(...), which handles the /login path. FastAPI provides us with the OAuth2PasswordRequestForm middleware, which extracts the credentials from the form on the UI, and makes them available within the form_data object:
async def login(request: Request, form_data: OAuth2PasswordRequestForm = Depends()):
    username = form_data.username
    password = form_data.password
    # ...
You can see how these parameters are used to instantiate and authenticate the user via Cognito with this third party library:
c = Cognito(AWS_COGNITO_POOL_ID, AWS_COGNITO_CLIENT_ID, username=form_data.username)
try:
    c.authenticate(password=form_data.password)
except Exception:
    # handle
access_token = c.access_token
We then retrieve the (unverified) credentials from the token via the handy get_credentials_from_token function as an instance of our Credentials dataclass, and store them in a cookie using the starlette provided SessionMiddleware.
FastAPI Dependables
On successful login, we are directed to another route and handler defined by the function user (for the /user route). If you look at the function signature, you can see that we're retrieving a default argument credentials via a call to a FastAPI "dependable" (Depends(...)) class:
@app.get("/user", response_class=HTMLResponse)
async def user(request: Request, credentials: Credentials = Depends(get_user_from_session)):
    claims = credentials.claims
    # ...
A "dependable" is a function that takes all of the same arguments as a path operation function (aka the route handling function), and returns whatever we might require for the handler. The Depends(fn) class takes the function and on execution will return the default argument. Here, we define a dependable get_user_from_session, which retrieves, verifies and returns the credentials so we can access the identity metadata.
def get_user_from_session(request: Request) -> dict:
    if (c := request.session.get("user_credentials")) is None:
        raise HTTPException(
            status_code=status.HTTP_307_TEMPORARY_REDIRECT,
            headers={"Location": request.url_for("index")},
        )
    else:
        creds = Credentials.from_dict(c)

    if not verify_jwt(creds):
        raise HTTPException(status_code=HTTP_403_FORBIDDEN, detail="JWK invalid")

    return creds
Principals and resources
The credentials contain the token claims, which in turn hold our user_id and cognito:groups metadata. We use this information to construct a Principal object, like so:
claims = credentials.claims
user_id = claims["sub"]
roles = claims.get("cognito:groups", [])

principal = Principal(
    user_id,
    roles=roles,
    policy_version="20210210",
    attr={
        "foo": "bar",
    },
)
In production scenarios, your protected resources would likely be held and retrieved from your chosen data store. For demo purposes, we manually construct two resources within the route logic:
actions = ["read", "update", "delete"]
resource_list = ResourceList(
    resources=[
        # This resource is owned by the user making the request
        ResourceAction(
            Resource(
                "abc123",
                "contact",
                attr={
                    "owner": user_id,
                },
            ),
            actions=actions,
        ),
        # This resource is owned by someone else
        ResourceAction(
            Resource(
                "def456",
                "contact",
                attr={
                    "owner": "other_user_id",
                },
            ),
            actions=actions,
        ),
    ]
)
We pass the principal and the resources within a call to Cerbos, and then use the response (housing the ALLOW/DENY result for each action in each resource) and the originally defined objects to construct the UI that you saw earlier on:
with CerbosClient(host="http://localhost:3592") as c:
    try:
        resp = c.check_resources(principal=principal, resources=resource_list)
        resp.raise_if_failed()
    except Exception:
        raise HTTPException(
            status_code=status.HTTP_403_FORBIDDEN, detail="Unauthorized"
        )

# render the TemplateResponse with the response, and other things...
You can see the raw response in the UI, along with a table detailing the returned permissions to each of the resources passed in the resource list!
Try logging in with different users and roles, and see how the response changes. You should notice Update and Delete permissions differ between the roles.
Optional: Enabling the hosted Cognito UI
Because we enabled a hosted UI when we initially set up the user pool, we can opt to enable this additional login flow within our application.
To do this, terminate the app, and set the following envvars (replacing the USER_POOL_NAME with what you set during pool configuration):
export AWS_COGNITO_POOL_NAME={USER_POOL_NAME}
export AWS_COGNITO_HOSTED_UI_CALLBACK_URL="http://localhost:8000/callback"
export AWS_COGNITO_HOSTED_UI_LOGOUT_URL="http://localhost:8000/"
Reload the app, ensure you're logged out, and you should be given the option to navigate to the hosted UI. And that's it!
If you have any questions or feedback, or to chat to us and other like-minded technologists, please join our Slack community!
Tagged in


